Not another football sim with a "match engine" black box
Most football management games tell you there's a match engine running under the hood. They don't tell you much about what it actually does. You pick a formation, set your tactics to "attacking," and then watch a bunch of dots move around for 90 minutes. Maybe you win, maybe you don't. Who knows why.
We built Kickoff Boss differently. The match engine has a clear structure, and once you understand it, you can actually use it. So let's walk through how goals happen in this game.
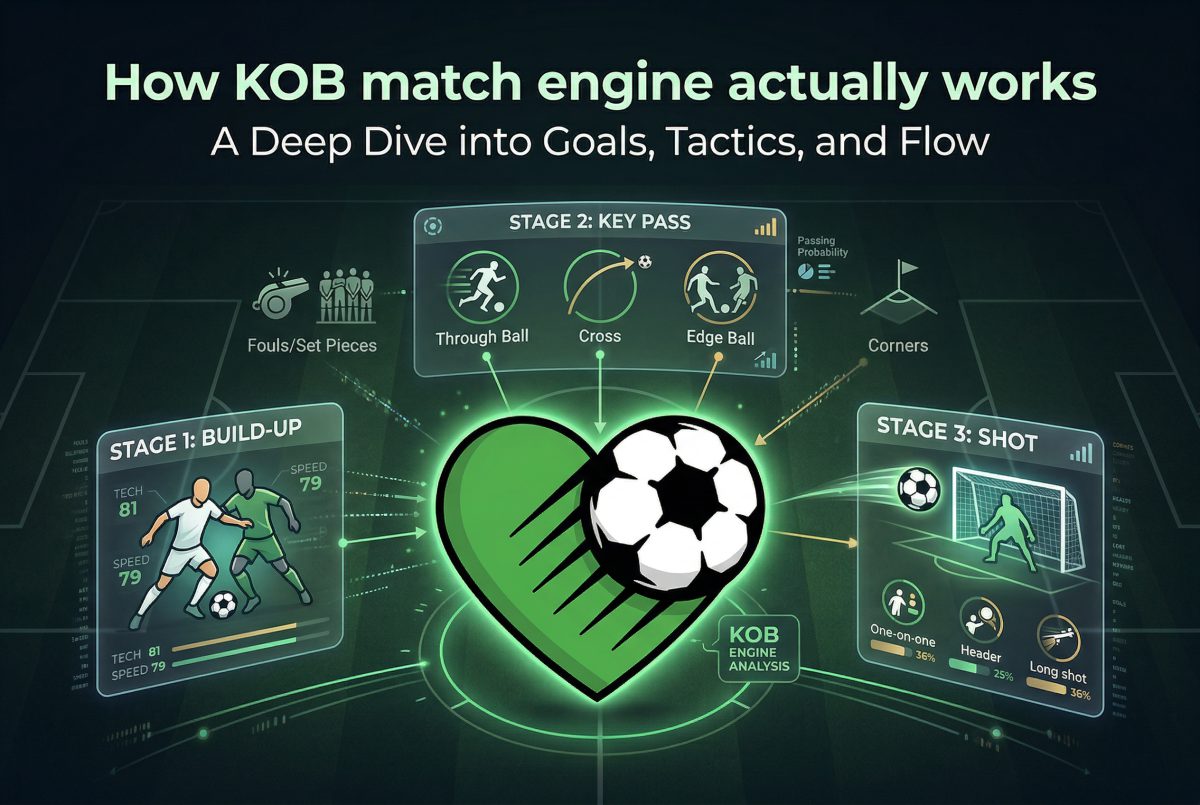
The three stages
Every attacking move passes through three stages, in order:
- Build-up - getting the ball into the opponent's half
- Key pass - creating the dangerous ball that sets up the chance
- Shot - the attempt on goal
A team has to win each stage to progress to the next. Fail at build-up and the attack is over. Win the build-up but lose the key pass, same thing. The defender intercepts, possession changes, and the other team starts their own cycle.
This isn't window dressing. It's the actual structure of the simulation. Every goal your team scores went through all three. Every attack that fizzled out failed at one of them. When you watch a match and wonder why your striker never got a sniff of the ball, the answer is usually that your midfield lost the build-up or your key passes got cut out before they reached anyone.
Stage 1: Build-up
The build-up is where your team tries to move the ball from midfield into a threatening position. The engine picks a player from your midfield or defence to carry the ball, and an opponent to challenge him.
Which player gets picked depends on a few things. Your build-up tactic matters: set it to "build in the center" and most of your build-ups should go through center midfield, with the odd one drifting wide because football doesn't always cooperate. Set it to "build on the sides" and the engine favors your wide players. Leave it neutral and it's split roughly evenly between left, center, and right.
Player duties matter too. A midfielder on attacking duty gets picked to start build-ups more often than one on defensive duty. If all your midfielders share the same duty, the engine treats them equally, so there's no priority between them. Mix your duties if you want certain players involved more.
The actual duel uses the player skills, like technique, speed, passing, and positioning for the attacker against positioning, speed, and tackling for the defender. Win the build-up and the play advances to a key pass. Lose it and the ball changes hands. Sometimes the opponent's midfielder tackles cleanly and starts their own attack. Sometimes the play just breaks down.
There's a chance of a foul during any build-up. Hard tackling increases it. If the referee blows, you get a free kick and skip straight to a set piece event.
Mistakes
Sometimes the engine triggers a mistake. One of the attacking team's players (usually someone with low experience) gives the ball away cheaply, and the opponent goes straight to the key pass stage. No build-up needed. It's the game's version of a turnover leading to a fast break.
You can't prevent mistakes entirely, but experienced players make fewer of them. Young squads give the ball away more. Keep that in mind when fielding teenagers in important matches.
Stage 2: Key pass
This is where the direction of your attack gets decided. The key pass is the ball that's supposed to create the shooting opportunity. Three types:
Through ball. A direct vertical pass behind the defensive line. The passer's passing and technique are tested against the defender's positioning and speed. If it works, your striker is through on goal for a one-on-one with the keeper. Hard to pull off, very dangerous when it lands. The "pass into space" approach setting pushes the engine towards these.
Cross ball. A ball swung into the box, usually from a wide position. The crosser's passing, technique, and speed go up against the defender's positioning, tackling, and speed. If it gets through, you're looking at a header. These show up more when the ball is already out wide from the build-up, and the "cross into the box" approach makes them even more frequent.
Edge ball. A shorter pass worked into space near the edge of the penalty area. Sets up a long-range shot. Less spectacular, but if your midfielders can shoot, it's a real weapon. "Shoot on sight" as your approach makes the engine favor these.
Your approach influences which type gets attempted, but doesn't guarantee it. A ball that's been built up on the right wing will more often turn into a cross than a central through ball, regardless of what you've told the team. Where the play actually is on the pitch matters.
If the key pass fails, a few things can happen. Clean tackle, possession changes. Ball goes out for a corner. Or the passer just puts it in the wrong place. Corners come up more often from failed crosses, which makes sense if you think about where those balls end up going wrong.
Corners
Corners work differently. When you win one, the engine skips the build-up and goes straight to the key pass stage as a set piece.
The corner taker is selected from your team roles (bot teams just use a random midfielder). Set piece skill is weighted 2.5x compared to their passing and technique, so it matters a lot who takes them. Players with the Set Piece Specialist trait get an extra 20% bonus.
You can set a corner target in your tactics: first post or second post. A skilled taker hits the intended post more often. No preference set? It's 50/50. From there it goes to a header situation.
Stage 3: The shot
Winning the key pass doesn't mean you've scored. It means you've created a chance. The player receiving the ball still has to get into position, and a defender will try to stop that from happening.
Which type of shot depends on which key pass preceded it:
- Through ball leads to a one-on-one with the keeper
- Cross ball leads to a header
- Edge ball leads to a long shot
- Corner leads to a header
Each uses different skills. One-on-ones convert at the highest rate but they're the hardest to create, because you had to beat the entire defensive line with a through ball first. Long shots are the easiest to get into position for but the hardest to actually put in the net. Headers fall somewhere in the middle. So "pass into space" is the greedy option, and "shoot on sight" is the safe one. Pick based on what your squad is actually good at.
If the keeper saves, the ball is usually cleared. But sometimes it deflects out for a corner, which gives you another crack at it. And if the defending team has the "goalkeeper counter-attack" option turned on, a save can trigger a fast break going the other way, if the goalkeeper is any good with his feet.
Where your tactical settings plug in
Now that you know the structure, here's how each setting connects to it.
Build-up (center / sides / balanced) controls where Stage 1 happens. Center means your central midfielders carry the load. Sides means your wide players. This decides which players get involved, so their individual attributes are what matters.
Approach (pass into space / cross into box / shoot on sight / balanced) controls which type of key pass your team attempts in Stage 2. The position of the ball from the build-up influences it too, but this setting pushes the probabilities.
Mentality (attacking / balanced / defending) applies a skill modifier across all three stages. Attacking mentality boosts your players when they have the ball but weakens them when they're defending. Defending does the opposite.
Marking (zonal / man / deep / closing down) is where things get interesting from a counter-tactical perspective. Man marking is strong against crosses. Dropping deep is strong against through balls. Closing down is strong against edge balls and long shots. Zonal is neutral everywhere. Pick the wrong one and you're giving the attacker a bonus. Pick right and you're shutting down their preferred route.
Tackling (soft / normal / hard) affects foul probability. Hard tackling wins more balls but fouls more, gets more cards, and causes more injuries. Soft tackling is cleaner but lets more attacks through.
Tempo (slow / balanced / fast) doesn't affect any individual duel. It changes how many events happen per minute. Fast tempo means more build-up attempts, more chances, more goals for both teams. Slow tempo reduces total events and tends to produce tighter scorelines.
Formation is checked against the default 4-4-2 baseline. Playing five defenders? Each gets a small bonus in their duels. Playing three? Each takes a small penalty. Same logic for midfield and attack. A 5-3-2 is better at defending and worse at creating chances. A 3-4-3 is the opposite. You're always giving something up.
Reading a match after it's played
The match stats make more sense once you know the three stages.
Lots of build-up attempts but few key passes? Your midfield is losing possession. Maybe the opponent's midfield is better, maybe you're building through your weakest area.
Key passes happening but few shots? The final ball isn't getting through. Check whether your approach is being countered by their marking.
Shots on target but no goals? Your forwards are getting chances but the keeper is winning. That's mostly player quality, sometimes just a rough day.
Low total events? Slow tempo. If you set that deliberately, fine. If not, the opponent slowed things down and you might want to force it the other way next time.
Every match follows this same structure and every tactical setting connects to a specific part of it. That's the whole point. The engine isn't a black box. Learn the flow, and you'll know why you lost before you even look at the score.